原文件地址:基于Docker搭建Hadoop+Hive - 知乎
为配合生产hadoop使用,在本地搭建测试环境,使用docker环境实现(主要是省事~),拉取阿里云已有hadoop镜像基础上,安装hive组件,参考下面两个专栏文章:
克里斯:基于 Docker 构建 Hadoop 平台
docker上从零开始搭建hadoop和hive环境
由于hadoop与hive等存在版本兼容问题,安装前可以先通过官网确认版本兼容情况:
http://hive.apache.org/downloads.html
本次使用的各版本配置如下:
- Docker 19.03.8- JDK 1.8- Hadoop 3.2.0- Hive 3.1.2- mysql 8.0.1- mysql-connector-java-5.1.49.jar- hive_jdbc_2.5.15.1040
Hadoop部分:
一、拉取镜像
docker pull registry.cn-hangzhou.aliyuncs.com/hadoop_test/hadoop_base
二、运行容器
进入容器看worker里面有三台机子,分别是Master、Slave1、Slave2
关于worker路径,通过etc/profile环境变量配置的文件即可查看hadoop安装目录
#随意建立个容器查看配置情况
docker run -it --name hadopp-test registry.cn-hangzhou.aliyuncs.com/hadoop_test/hadoop_base
#查看系统变量路径
vim etc/profile
#查看worker情况
vim /usr/local/hadoop/etc/hadoop/workers
- 建立hadoop用的内部网络
#指定固定ip号段
docker network create --driver=bridge --subnet=172.19.0.0/16  hadoop
- 建立Master容器,映射端口
10000端口为hiveserver2端口,后面本地客户端要通过beeline连接hive使用,有其他组件要安装的话可以提前把端口都映射出来,毕竟后面容器运行后再添加端口还是有点麻烦的
docker run -it --network hadoop -h Master --name Master -p 9870:9870 -p 8088:8088 -p 10000:10000 registry.cn-hangzhou.aliyuncs.com/hadoop_test/hadoop_base bash
- 创建Slave1容器
docker run -it --network hadoop -h Slave1 --name Slave1 registry.cn-hangzhou.aliyuncs.com/hadoop_test/hadoop_base bash
- 创建Slave2容器
docker run -it --network hadoop -h Slave2 --name Slave2 registry.cn-hangzhou.aliyuncs.com/hadoop_test/hadoop_base bash
- 三台机器,都修改host vim /etc/hosts
172.20.0.4	Master
172.20.0.3	Slave1
172.20.0.2	Slave2
三、启动hadoop
虽然容器里面已经把hadoop路径配置在系统变量里面,但每次进入需要运行source /etc/profile才能生效使用
- 进入master,启动hadoop,先格式化hdfs
#进入Master容器
docker exec -it Master bash
#进入后格式化hdfs
root@Master:/# hadoop namenode -format
- 启动全部,包含hdfs和yarn
root@Master:/usr/local/hadoop/sbin# ./start-all.sh
可以看到服务起来了,本地范围宿主机ip的8088及9870端口可以看到监控信息
Starting namenodes on [Master]
Master: Warning: Permanently added 'master,172.19.0.4' (ECDSA) to the list of known hosts.
Starting datanodes
Slave1: Warning: Permanently added 'slave1,172.19.0.3' (ECDSA) to the list of known hosts.
Slave2: Warning: Permanently added 'slave2,172.19.0.2' (ECDSA) to the list of known hosts.
Slave1: WARNING: /usr/local/hadoop/logs does not exist. Creating.
Slave2: WARNING: /usr/local/hadoop/logs does not exist. Creating.
Starting secondary namenodes [Master]
Starting resourcemanager
Starting nodemanagers
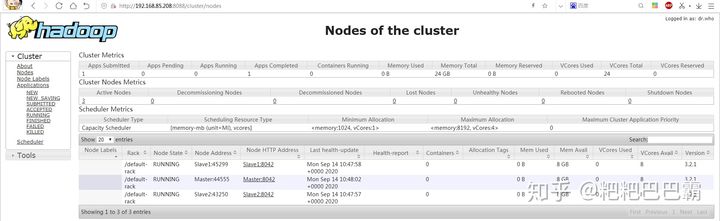
查看分布式文件系统状态
root@Master:/usr/local/hadoop/sbin# hdfs dfsadmin -report
四、运行内置WordCount例子
把license作为需要统计的文件
root@Master:/usr/local/hadoop# cat LICENSE.txt > file1.txt
root@Master:/usr/local/hadoop# ls
LICENSE.txt  NOTICE.txt  README.txt  bin  etc  file1.txt  include  lib  libexec  logs  sbin  share
在 HDFS 中创建 input 文件夹
root@Master:/usr/local/hadoop# hadoop fs -mkdir /input
上传 file1.txt 文件到 HDFS 中
root@Master:/usr/local/hadoop# hadoop fs -put file1.txt /input
2020-09-14 11:02:01,183 INFO sasl.SaslDataTransferClient: SASL encryption trust check: localHostTrusted = false, remoteHostTrusted = false
查看 HDFS 中 input 文件夹里的内容
root@Master:/usr/local/hadoop# hadoop fs -ls /input
Found 1 items
-rw-r--r--   2 root supergroup     150569 2020-09-14 11:02 /input/file1.txt
运作 wordcount 例子程序
root@Master:/usr/local/hadoop# hadoop jar share/hadoop/mapreduce/hadoop-mapreduce-examples-3.2.1.jar wordcount /input /output
查看 HDFS 中的 /output 文件夹的内容
root@Master:/usr/local/hadoop# hadoop fs -ls /output
Found 2 items
-rw-r--r--   2 root supergroup          0 2020-09-14 11:09 /output/_SUCCESS
-rw-r--r--   2 root supergroup      35324 2020-09-14 11:09 /output/part-r-00000
查看part-r-00000文件的内容,就是运行的结果
root@Master:/usr/local/hadoop# hadoop fs -cat /output/part-r-00000
Hadoop 部分结束了
HIVE部分:
Hive下载后上传到容器目录下:
下载地址:Index of /apache/hive/hive-3.1.2
https://mirror-hk.koddos.net/apache/hive/hive-3.1.2/
一、解压安装包
# 拷贝安装包进Master容器
docker cp apache-hive-3.1.2-bin.tar.gz Master:/usr/local
# 进入容器
docker exec -it Master bash
cd /usr/local/
# 解压安装包
tar xvf apache-hive-3.1.2-bin.tar.gz
二、修改配置文件
root@Master:/usr/local/apache-hive-3.1.2-bin/conf# cp hive-default.xml.template hive-site.xml
root@Master:/usr/local/apache-hive-3.1.2-bin/conf# vim hive-site.xml
在最前面添加下面配置:
  <property>
    <name>system:java.io.tmpdir</name>
    <value>/tmp/hive/java</value>
  </property>
  <property>
    <name>system:user.name</name>
    <value>${user.name}</value>
  </property>
三、配置Hive相关环境变量
vim /etc/profile

#文本最后添加
export HIVE_HOME="/usr/local/apache-hive-3.1.2-bin"
export PATH=$PATH:$HIVE_HOME/bin
配置后执行source /etc/profile 生效
source /etc/profile
四、配置mysql作为元数据库
1.拉取Mysql镜像并生产容器:
#拉取镜像
docker pull mysql:8:0.18
#建立容器
docker run --name mysql_hive -p 4306:3306 --net hadoop --ip 172.19.0.5 -v /root/mysql:/var/lib/mysql -e MYSQL_ROOT_PASSWORD=abc123456 -d mysql:8.0.18
#进入容器
docker exec -it mysql_hive bash
#进入myslq
mysql -uroot -p
#密码上面建立容器时候已经设置abc123456
#建立hive数据库
create database hive;
#修改远程连接权限
ALTER USER 'root'@'%' IDENTIFIED WITH mysql_native_password BY 'abc123456';
ps:容器ip地址类似window的分配机制,如果不设置固定ip容器重启后会自动分配ip,因此数据库相关的容器建议设置为固定ip。
2.回去Master容器,修改关联数据库的配置
docker exec -it Master bash
vim /usr/local/apache-hive-3.1.2-bin/conf/hive-site.xml
搜索关键词修改数据库url、驱动、用户名,url根据上面建容器时候地址。
#还请注意hive配置文件里面使用&amp;作为分隔,高版本myssql需要SSL验证,在这里设置关闭
<property>
<name>javax.jdo.option.ConnectionUserName</name>
<value>root</value>
</property>
<property>
<name>javax.jdo.option.ConnectionPassword</name>
<value>abc123456</value>
</property>
<property>
<name>javax.jdo.option.ConnectionURL</name>
<value>jdbc:mysql://172.19.0.5:3306/hive?createDatabaseIfNotExist=true&amp;useSSL=false</value>
</property>
<property>
<name>javax.jdo.option.ConnectionDriverName</name>
<value>com.mysql.jdbc.Driver</value>
</property>
<property>
<name>hive.metastore.schema.verification</name>
<value>false</value>
<property>
3.mysql驱动上传到hive的lib下
#前面已经跟hive安装包一起上传到容器/usr/local目录
root@Master:/usr/local# cp mysql-connector-java-5.1.49.jar /usr/local/apache-hive-3.1.2-bin/lib
4.jar包配置修改
对hive的lib文件夹下的部分文件做修改,不然初始化数据库的时候会报错
#slf4j这个包hadoop及hive两边只能有一个,这里删掉hive这边
root@Master:/usr/local/apache-hive-3.1.2-bin/lib# rm log4j-slf4j-impl-2.10.0.jar

#guava这个包hadoop及hive两边只删掉版本低的那个,把版本高的复制过去,这里删掉hive,复制hadoop的过去
root@Master:/usr/local/hadoop/share/hadoop/common/lib# cp guava-27.0-jre.jar /usr/local/apache-hive-3.1.2-bin/lib
root@Master:/usr/local/hadoop/share/hadoop/common/lib# rm /usr/local/apache-hive-3.1.2-bin/lib/guava-19.0.jar

#把文件hive-site.xml第3225行的特殊字符删除
root@Master: vim /usr/local/apache-hive-3.1.2-bin/conf/hive-site.xml
五、初始化元数据库
root@Master:/usr/local/apache-hive-3.1.2-bin/bin# schematool -initSchema -dbType mysql
成功后提示:
Metastore connection URL:        jdbc:mysql://172.19.0.5:3306/hive?createDatabaseIfNotExist=true&useSSL=false
Metastore Connection Driver :    com.mysql.jdbc.Driver
Metastore connection User:       root
Starting metastore schema initialization to 3.1.0
Initialization script hive-schema-3.1.0.mysql.sql
Initialization script completed
schemaTool completed
六、验证
- 我们先创建一个数据文件放到
/usr/local下
cd /usr/local
vim test.txt
1,jack
2,hel
3,nack
- 进入hive交互界面
root@Master:/usr/local# hive
Hive Session ID = 7bec2ab6-e06d-4dff-8d53-a64611875aeb

Logging initialized using configuration in jar:file:/usr/local/apache-hive-3.1.2-bin/lib/hive-common-3.1.2.jar!/hive-log4j2.properties Async: true
Hive-on-MR is deprecated in Hive 2 and may not be available in the future versions. Consider using a different execution engine (i.e. spark, tez) or using Hive 1.X releases.
Hive Session ID = 5cdee915-5c95-4834-bd3b-bec6f3d90e5b
hive> create table test(
    >     id      int
    >    ,name    string
    > )
    > row format delimited
    > fields terminated by ',';
OK
Time taken: 1.453 seconds
hive> load data local inpath '/usr/local/test.txt' into table test;
Loading data to table default.test
OK
Time taken: 0.63 seconds
hive> select * from test;
OK
1       jack
2       hel
3       nack
Time taken: 1.611 seconds, Fetched: 3 row(s)
hive安装完毕
启动 Hiveserver2
一、修改hadoop的一些权限配置
root@Master:/usr/local# vim /usr/local/hadoop/etc/hadoop/core-site.xml
- 加入以下配置
<property>
    <name>hadoop.proxyuser.root.hosts</name>
    <value>*</value>
</property>
<property>
    <name>hadoop.proxyuser.root.groups</name>
    <value>*</value>
</property>
- 重启hdfs:
root@Master:/usr/local/hadoop/sbin# ./stop-dfs.sh
Stopping namenodes on [Master]
Stopping datanodes
Stopping secondary namenodes [Master]
root@Master:/usr/local/hadoop/sbin# ./start-dfs.sh
Starting namenodes on [Master]
Starting datanodes
Starting secondary namenodes [Master]
二、后台启动hiveserver2
root@Master:/usr/local/hadoop/sbin#  nohup hiveserver2 >/dev/null 2>/dev/null &
[2] 7713
三、验证
通过beeline连接并查询
查看10000端口运行正常,beeline命令,!connect连接,结果查询正常
!connect jdbc:hive2://localhost:10000/default
root@Master:/usr/local/hadoop/sbin# netstat -ntulp |grep 10000
tcp        0      0 0.0.0.0:10000           0.0.0.0:*               LISTEN      7388/java
root@Master:/usr/local/hadoop/sbin# beeline
Beeline version 3.1.2 by Apache Hive
beeline> !connect jdbc:hive2://localhost:10000/default
Connecting to jdbc:hive2://localhost:10000/default
Enter username for jdbc:hive2://localhost:10000/default: root
Enter password for jdbc:hive2://localhost:10000/default: *********
Connected to: Apache Hive (version 3.1.2)
Driver: Hive JDBC (version 3.1.2)
Transaction isolation: TRANSACTION_REPEATABLE_READ
0: jdbc:hive2://localhost:10000/default> select * from test;
INFO  : Compiling command(queryId=root_20200915075948_0672fa16-435e-449c-9fcd-f71fcdf6841c): select * from test
INFO  : Concurrency mode is disabled, not creating a lock manager
INFO  : Semantic Analysis Completed (retrial = false)
INFO  : Returning Hive schema: Schema(fieldSchemas:[FieldSchema(name:test.id, type:int, comment:null), FieldSchema(name:test.name, type:string, comment:null)], properties:null)
INFO  : Completed compiling command(queryId=root_20200915075948_0672fa16-435e-449c-9fcd-f71fcdf6841c); Time taken: 2.584 seconds
INFO  : Concurrency mode is disabled, not creating a lock manager
INFO  : Executing command(queryId=root_20200915075948_0672fa16-435e-449c-9fcd-f71fcdf6841c): select * from test
INFO  : Completed executing command(queryId=root_20200915075948_0672fa16-435e-449c-9fcd-f71fcdf6841c); Time taken: 0.004 seconds
INFO  : OK
INFO  : Concurrency mode is disabled, not creating a lock manager
+----------+------------+
| test.id  | test.name  |
+----------+------------+
| 1        | jack       |
| 2        | hel        |
| 3        | nack       |
+----------+------------+
3 rows selected (3.194 seconds)
0: jdbc:hive2://localhost:10000/default>
Hiveserver2配置完毕
本地使用SQL Developer连接Hive
工具oracle官网下载即可,免费,驱动到cloudera官网下,在工具第三方驱动处安装
Oracle SQL Developer 下载
Download Hive JDBC Driver 2.5.15

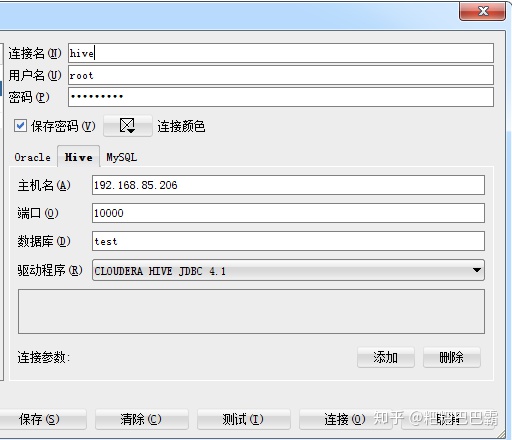
IP为宿主机的IP,端口则是一开始建立容器映射的10000端口
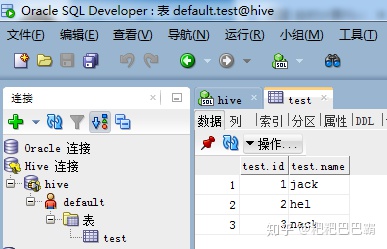
可以看到前面验证的test的表
镜像已上传阿里云:
registry.cn-shenzhen.aliyuncs.com/rango/myhadoop
更多信息请关注公众号:
